Friday, August 31, 2012

Access Specifiers in C#.

They are used to define scope of the Class or its Members i,e who can access it and who cannot Access it.

Here we will discuss about each access specifier with an example. 


.Net Supports five Access Specifiers.


1 Public.

2 Private.
3 Protected.
4 Internal.
5 Protected Internal.


public:


So any member declared as public can be accessed from the outside the class.


We can access from other class using object reference.


Example 


File-New- Project- Console Application.


In the above example we have created a object in Derived Class , since the variable is public it can be accessed from outside the class.

output


private


Members declared as private are not Accessible outside the class.

A class under Namespace cannot be declared as private.


Example 


Output:


Example for Public and Private Access Specifier.


output


2 Example


output 


Protected

If the members are declared as  protected , then they can be accessed only From the child class., it is same as private.


Note: A class under Namespace cannot be declared as private. 

This access specifier is used when we need to use Inheritance in the program.


output


Another Example of working with Protected Access Specifier.


Internal


Members are declared as internal under a class than they r accessible only with in the Project either from the Child Class or a Non Child Class. These are accessible only within the Assembly.


internal  is the default Access Specifier for the Class.


output


Protected Internal 


Members declared as ProtectedInternal under a Class enjoys Dual Scope. i,e with the project they behave as internal members and provide access to all the classes, outside the project they change to Protected and still provide access to there child classes.


Output:


Add a new project under the solution of type Console Application, name it as ConsoleApplication2 & rename the default file Program.cs as Four.cs so that class name also changes as Four, now write the following code in it by adding the reference of ConsoleApplication1 assembly from its physical location.


Sunday, August 26, 2012

ICALL BACK EVENT HANDLER

We have to play with 4 functions,

Two client side functions i.e. java script function, 
JavaScript Functions
RaiseCallbackEvent function gets call automatically whenever there is a CallbackEvent. And after this function 2nd function i.e. GetCallbackResult get called automatically.
DataBase Design
<html xmlns="http://www.w3.org/1999/xhtml">
    function ReceiveServerData(retValue) {
using System.Data.SqlClient;
public partial class AddPage : System.Web.UI.Page,ICallbackEventHandler
    }
    public void RaiseCallbackEvent(String eventArgument)
Output


Two server side function i.e. c# (in this case).

1 function ReceiveServerData(retValue)
2 function Checkusername 


.cs functions
1  public void RaiseCallbackEvent(String eventArgument)
 public String GetCallbackResult()


AddPage.aspx

<head runat="server">
    <title></title>
    <script type="text/javascript" language="javascript">
    function Checkusername ()
    {
        var values = document.getElementById("txtEname").value;
        CallServer(values, "");
    }

        if (retValue == "N") {
            alert("Please select another name; empname already exists");
            document.getElementById("txtEname").value = "";
            document.getElementById("txtEname").focus();
        }
        }
    </script>
</head>
<body>
    <form id="form1" runat="server">
    <div>
    <table>
    <tr>
    <td>
        <asp:Label ID="Label1" runat="server" Text="Eno"></asp:Label>
    </td>
    <td>
        <asp:TextBox ID="txtEno" runat="server"  ></asp:TextBox>
    </td>
    </tr>
        <tr>
    <td>
        <asp:Label ID="Label2" runat="server" Text="Ename"></asp:Label>
    </td>
    <td>
        <asp:TextBox ID="txtEname" runat="server" onblur="javascript:Checkusername()"></asp:TextBox>
    </td>
    </tr>
    <tr>
    <td>
     <asp:Label ID="Label3" runat="server" Text="Designation"></asp:Label>
    </td>
    <td>
     <asp:TextBox ID="txtDesignation" runat="server"></asp:TextBox>
    </td>
    </tr>
    <tr>
    <td colspan="2" align="center">
        <asp:Button ID="btnSave" runat="server" Text="Save" onclick="btnSave_Click" />
    </td>
    </tr>
    </table>
    </div>
    </form>
</body>
</html>


AddPage.aspx.cs

using System.Configuration;

{
    protected String returnValue;
    protected void Page_Load(object sender, EventArgs e)
    {
        String cbReference = Page.ClientScript.GetCallbackEventReference(this, "arg","ReceiveServerData", "context");
        string callbackScript = "function CallServer(arg,context)" + "{" + cbReference + ";}";
        Page.ClientScript.RegisterClientScriptBlock(this.GetType(), "CallServer", callbackScript,true);
    }
    protected void btnSave_Click(object sender, EventArgs e)
    {
        SqlConnection con = new SqlConnection("user id=sa;password=uday;database=uday;data source=localhost");
        con.Open();
        SqlCommand cmd = new SqlCommand("insert into employee values(" + txtEno.Text + ",'" + txtEname.Text + "','" + txtDesignation.Text + "')", con);
        int i=cmd.ExecuteNonQuery();
        if(i>0)
        {
            Response.Redirect("Default.aspx");
        }
        con.Close();


    {
        SqlConnection con = new SqlConnection("user id=sa;password=uday;database=uday;data source=localhost");
        SqlCommand com = new SqlCommand("select *from employee where ename='" +eventArgument + "'", con);
        con.Open();
        SqlDataReader dr;
        dr = com.ExecuteReader();
        if (dr.HasRows == true)
        {
            returnValue = "N";
        }
        else
        {
            returnValue = "Y";
        }
        con.Close();
    }
    public String GetCallbackResult()
    {
        return returnValue;
    }
}


Monday, August 20, 2012

Working with JSON

JSON (JavaScript Object Notation) is one lightweight data exchange format.

You don’t need to download an additional library to serialize/deserialize your objects to/from JSON. Since .NET 3.5, .NET can do it natively.
Add a reference to your project to “System.Web.Extensions.dll”
File->New->Website
Add a Class(Static.cs)
Now write the Following Code in Static.cs 
using System;
/// <summary>
    public String Technologies()
    public ArrayList EmpDetails()
    public string JsonString()
Now Add New Item
Default.aspx
<html xmlns="http://www.w3.org/1999/xhtml">
Default.aspx.cs
using System.Web.UI;
public partial class Default3 : System.Web.UI.Page
Now Run
Paste the following output and Click on Viewer
using System.Web.UI;
public partial class Default3 : System.Web.UI.Page

using System.Collections.Generic;
using System.Linq;
using System.Web;
using System.Web.Script.Serialization;
using System.Collections;

/// Summary description for Static
/// </summary>
public class Static
{
    JavaScriptSerializer jss = new JavaScriptSerializer();

    {
        string jsonString = string.Empty;
        string[] courses = { "asp.net", "sqlserver", "silverlight", "sharepoint", "iPhone", "vb.net", "java", "php" };
        Dictionary<string, string[]> dicEmpInfo = new Dictionary<string, string[]>();
        dicEmpInfo.Add("Technologies", courses);
        jsonString = jss.Serialize(dicEmpInfo);
        return jsonString;
    }

    {
        Dictionary<string, string> dicpersonalinfo = new Dictionary<string, string>();
        dicpersonalinfo.Add("First Name", "Uday");
        dicpersonalinfo.Add("LastName", "Kumar");
        Dictionary<string, string> dicpersonalInfo2 = new Dictionary<string, string>();
        dicpersonalInfo2.Add("FirstName", "Anvesh");
        dicpersonalInfo2.Add("LastName", "G");
        Dictionary<string, string> dicpersonalInfo3 = new Dictionary<string, string>();
        dicpersonalInfo3.Add("FirstName", "Sunitha");
        dicpersonalInfo3.Add("LastName", "Kumari");
        Dictionary<string, string> dicpersonalInfo4 = new Dictionary<string, string>();
        dicpersonalInfo4.Add("FirstName", "Badri");
        dicpersonalInfo4.Add("LastName", "Nath");
        ArrayList empDetails = new ArrayList();
        empDetails.Add(dicpersonalinfo);
        empDetails.Add(dicpersonalInfo2);
        empDetails.Add(dicpersonalInfo3);
        empDetails.Add(dicpersonalInfo4);
        //string strJson = jss.Serialize(empDetails);
        return empDetails;
    }

    {
        string jsonString1 = string.Empty;
        ArrayList arr = EmpDetails();
        jsonString1 = jss.Serialize(arr);
        return jsonString1;
    }
}


<head runat="server">
    <title></title>
</head>
<body>
    <form id="form1" runat="server">
    <div>
    </div>
    </form>
</body>
</html>


using System.Web.UI.WebControls;

{
    protected void Page_Load(object sender, EventArgs e)
    {
        Static obj = new Static();
        string str = obj.Technologies();
        Response.Write(str);
    }
}


Now Go to 


For Second Method in static.cs

Default.aspx.cs


using System.Web.UI.WebControls;

{
    protected void Page_Load(object sender, EventArgs e)
    {
        Static obj = new Static();
        string str = obj.Technologies();
       // Response.Write(str);
        string str1 = obj.JsonString();
        Response.Write(str1);
    }
}


copy the output and 
Now Go to 


Sunday, August 19, 2012

Encrypt and Decrypt Connection Strings in Web.Config

Encryption and Decryption using Web.Config

File->New->WebSite


Go to web.config file and write the following code.


<connectionStrings>
    <add name="dbemployee" connectionString="Data Source=localhost; user id=sa;password=uday; database=uday"
      providerName="System.Data.SqlClient" />
  </connectionStrings>

Now go to Visual Stdio CommandPrompt and type the following to encypt the web.config file.

aspnet_regiis.exe -pef "connectionStrings" path of the file

Eg: aspnet_regiis.exe -pef "connectionStrings"  C:\Users\uday\Documents\WebSite3


here pef indicates file system website.

Now go to web.config and see the web.config file with the encrypted code

Web.config


Decrypt the Connection String

Now go to Visual Stdio CommandPrompt and type the following to decrypt the web.config file

aspnet_regiis.exe -pdf "connectionStrings" path of the file

Eg: aspnet_regiis.exe -pdf "connectionStrings"  C:\Users\uday\Documents\WebSite3


Web.config


Working with Cookies

Working with Cookies

Cookies : The information which is stored in Client Machine.

Syntax for creating the cookie
To create or retrieve information from cookie we have a class called as
1)  HttpCookie object=new HttpCookie(cookiename, cookievalue);
Now to store the above cookie we have to write the next line asResponse.Cookies.Add(object);

2) HttpCookie object=new HttpCookie(cookiename);object.Value=cookie.value;Response.Cookies.Add(object);

Retrieving the information from a Cookie
Syntax1)  HttpCookie object=Request.Cookies["Cookiename"];variable=object.Value;
2) variable=Request.Cookies["Cookiename"].value;

Cookies are classified into Two Types
1 In Memory Cookies2 Out Memory Cookies

In Memory Cookies: Are again classified into two types1 Single Value Cookie2 Multi Value Cookie
Out Memory Cookies:

Are again classified into two types1 Single Value Cookie2 Multi Value Cookie
InMemory Cookie:The cookies which are stored in the browser process memory are called as inmemory cookie.

These cookies will automatically destroy themselves when the browser is closed.so the default life span of the inmemory cookie is till the browser is on.

SingleValueCookie

Which stores only the single cookie is called as single value cookie.

Example
Default.aspx


Default.aspx.cs


Multi Value Cookie 
 A cookie which holds multiple values in a single name.

How to Create MultiValue Cookie

HttpCookie object=new HttpCookie(cookiename);
object.Values["key"]="value";
or
object.Values.Add("key","value1");
object.Values.Add("key","value2");

To Store the Cookie 
Response.Cookies.Add(object);

To Retrieve information

HttpCookie object =Request.Cookies["CookieName"];

To get Count
Object.Values.Count

To get Keys
Object.Values.GetKey(index);

To get KeyValues
Object.Values[index];
Object.Values.Get(index);

Example 
Default.aspx


Default.aspx.cs


Output


When Click on Create Cookie  

It displays a Message as Cookie Created.


When Click on Display Cookie


Out Memory Cookie

A cookie which is stored permanently on the hard disc of a client machine .

Syntax for Creating  Single Value Cookie

HttpCookie obj=new HttpCookie("cookiename");
obj.Value=someValue;
obj.Expires=DateTime.Now.AddMinutes();

Supported Methods

AddSeconds();
AddHours();
AddMonths();
AddYears();
AddDays();
DateTime.MaxValue

To Store Cookie in the Hard Disc

Response.Cookies.Add(object);

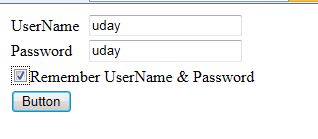
Default.aspx

       <table>
       <tr>
       <td>
           <asp:Label ID="Label1" runat="server" Text="UserName"></asp:Label>
       </td>
       <td>
           <asp:TextBox ID="txtUserName" runat="server"></asp:TextBox>
       </td>
       </tr>
        <tr>
       <td>
           <asp:Label ID="Label2" runat="server" Text="Password"></asp:Label>
       </td>
       <td>
           <asp:TextBox ID="txtPassword" runat="server"></asp:TextBox>
       </td>
       </tr>
       <tr>
       <td colspan="2">
           <asp:CheckBox ID="CheckBox1" runat="server" Text="Remember UserName & Password"/>
       </td>
       </tr>
       <tr>
       <td colspan="2">
             <asp:Button ID="Button1" runat="server" Text="Button" onclick="Button1_Click" />
       </td>
       </tr>
       </table>


Default.aspx.cs


public partial class _Default : System.Web.UI.Page
{
    protected void Page_Load(object sender, EventArgs e)
    {
        if (Request.Cookies["username"] != null && Request.Cookies["password"] != null)
        {
            if (Request.Cookies["username"].Value.ToString() == "uday" && Request.Cookies["password"].Value.ToString() == "uday")
            {

                Response.Redirect("Default2.aspx");
            }
        }
    }

    protected void Button1_Click(object sender, EventArgs e)
    {
        if (txtUserName.Text == "uday" && txtPassword.Text == "uday")
        {
            if (CheckBox1.Checked == true)
            {
                HttpCookie cookie = new HttpCookie("username", txtUserName.Text);
                cookie.Expires = DateTime.MaxValue;
                HttpCookie p = new HttpCookie("password", txtPassword.Text);
                p.Expires = DateTime.MaxValue;
                Response.Cookies.Add(cookie);
                Response.Cookies.Add(p);
            }
        }
    }
}

Output


________________________________________________________________


________________________________________________________________


Example for writing the cookies

Response.Cookies["uday"].Value = "abc";
Response.Cookies["uday"].Expires = DateTime.Now.AddDays(1);
_________________________________________________________________________________

HttpCookie anvesh= new HttpCookie("goud");
anvesh.Value = DateTime.Now.ToString();
anvesh.Expires = DateTime.Now.AddDays(1);Response.Cookies.Add(anvesh);
__________________________________________________________

Reading Cookies

if(Request.Cookies["uday"] != null)
    lblCookie.Text = Server.HtmlEncode(Request.Cookies["uday"].Value);
__________________________________________________________

Deleting Cookies
HttpCookie demoCookie = new HttpCookie("uday");demoCookie.Value = DateTime.Now.ToString();demoCookie.Expires = DateTime.Now.AddDays(-1);Response.Cookies.Add(uday);
________________________________________________________________

Advantages

1  Cookies are stored on client.
2  Easy to Implement
3. You can configure cookies to expire when the browser session ends (session cookies) or they can exist for a specified length of time on the client computer (persistent cookies). 

Disadvantages

1 User can delete cookie

2 No Security


Python -3

  Lists It is used to store Collection of data. Lists are created using square brackets: List Items Order cannot be changed. It can have dup...