Monday, September 30, 2013

Visual Studio 2013 : Peek Definition a new feature

Peek Definition in Visual Studio 2013:

In the earlier version of Visual Studio, When we need to see the definition of method then we can to right click that method and then click on Go To Definition(F12) and then code will be navigate to that method.


GoToDefinitionVisualStudio2012

Once you click on Go To Definition It will navigate to that method.

MethodFromGotoDefinitionVisualStudiofeature

Now in Visual Studio you have one more feature called Peek Definition(Alt + F12).

PeekDefinitionVisualStudio2013

Once you click on peek definition, It will open a small window and show the definition and code for that method.

PeekDefinitionWindowVisualStudio2013

It’s a nice way to see the code of particular method without moving to another .cs file. Another benefit is that it is a recursive like Go To Definition you can navigate to deeper and deeper without moving to another file.

Visual Studio TICK 2 Use Ctrl+I Instead of Ctrl+F


This tip is mostly for Visual Studio 2010 users: stop using Ctrl_F. Ctrl_F brings up the Find dialog where you can type in your search text, press the <Enter> key to search, and (eventually) close the dialog because it's blocking your view. Instead, use Ctrl_i (for "incremental search"). After pressing Ctrl_i, just start typing and your cursor will skip to the first occurrence of whatever you've typed so far, no dialog required. Often you'll find your cursor sitting on what you were looking for before you've typed in everything you thought you'd need to find it.


After entering your search text, pressing Ctrl_i again will take you to the next matching entry, as will F3 if you'd prefer something more familiar (Ctrl_Shift_i will take you to the previous entry). When you do find what you want, just press <Esc> to end the search and go back to making changes. There is one difference between using Ctrl_i and F3 to go to the next matching entry: when you've visited all the matching entries on the page, F3 pops up a dialog box to tell you so; Ctrl_i just cycles through the entries again.

The one downside of the incremental search is that it only searches within a document. However, that means that I use my Find dialog just for "Entire Solution" searches. While the incremental search ignores the scope setting on the Find dialog, it does pick up the dialog's other settings (e.g. "Match Case").
Why is this tip "mostly for Visual Studio 2010 users"? Because, in Visual Studio 2012, this is also the way that the Find dialog works: it starts searching as soon as you start typing.

Visual Studio TRICK 1

Move line up down with Visual Studio 2013.

During writing code some times we required to move lines of code up and down the earlier we have to cut and paste the line. But with Visual Studio 2013 preview there a short cut to do that and it will be useful when we are refactoring our code and doing some changes. There is a short cut to move lines up with Alt + up arrow keys and same way for moving down Alt+ down keys.

For example I have following code there.

UpArrowKeyMoveLinesvisualStudio2013


Now I am pressing Alt+ Up arrow keys

UpArrowKeyMoveLinesvisualStudio20132
====================================================================


Monday, September 16, 2013

Inserting New Data using ADO.NET ENTITY FRAMEWORK

ADO.NET ENTITY FRAMEWORK WITH PARENT CHILD TABLE USING CONSOLE APPLICATION.

    Generating Model from Database


File->New project


·        In the Solution Explorer right-click on the project and choose Add | New Item.

·        In the dialog choose ADO.NET Entity Data Model, click Add. This launches Entity Data Model Wizard.


·        In the wizard choose Generate from database, click next.


Click on New Connection.


Click on Next Button. 


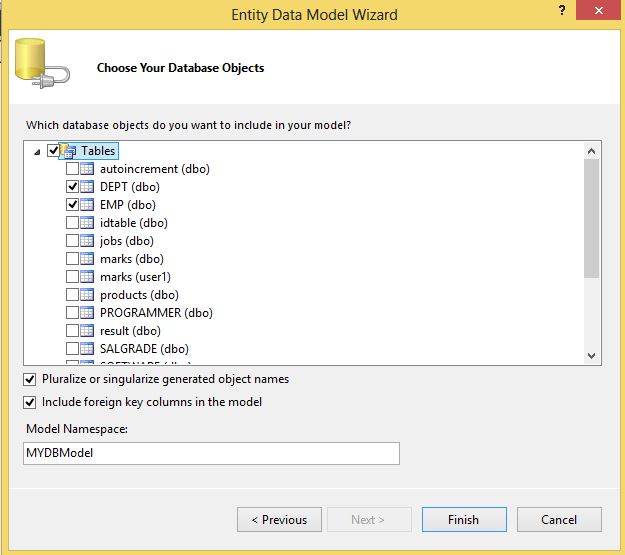
Select the tables and click on finish.

Go to Program.cs and write the following code 


    output


Sunday, September 15, 2013

ADO.NET ENTITY FRAMEWORK WITH PARENT CHILD TABLE USING CONSOLE APPLICATION


   Generating Model from Database

File->New project


·        In the Solution Explorer right-click on the project and choose Add | New Item.

·        In the dialog choose ADO.NET Entity Data Model, click Add. This launches Entity Data Model Wizard.
And click on add


·        In the wizard choose Generate from database, click next.

     
    Click on New Connection.


Click on OK Button.


Click on Next Button. 


Select the tables and click on finish.


Go to Program.cs and write the following code 


Output

Kubernetes

Prerequisites We assume anyone who wants to understand Kubernetes should have an understating of how the Docker works, how the Docker images...