Saturday, March 7, 2015

RESTFUL service using WCF


Delete the default two files: that is IService, Service1.


Add-> New Item.


Add New Item and select Class


Employee.cs

[DataContract]
    public class Employee
    {
        [DataMember]
        public int UserId { get; set; }
        [DataMember]
        public string FirstName { get; set; }
        [DataMember]
        public string LastName { get; set; }
        [DataMember]
        public int Salary { get; set; }
    }
    public partial class EmployeeData
    {
        private static readonly EmployeeData _instance = new EmployeeData();
        private EmployeeData() { }
        public static EmployeeData Instance
        {
            get
            {
                return _instance;
            }
        }

        public List<Employee> EmployeeList
        {
            get
            {
                return employee;
            }
        }
            private List<Employee> employee = new List<Employee>() 
            { 
                 new Employee() { UserId = 1, FirstName = "Product 1", LastName = "Category ", Salary=10}, 
                new Employee() { UserId = 1, FirstName = "Product 1", LastName = "Category ", Salary=10}, 
                new Employee() { UserId = 1, FirstName = "Product 1", LastName = "Category ", Salary=10}
            };

        }


Iservice.cs


Service1.cs


Global.asax.


web.config.


Output:


Friday, March 6, 2015

MVC WITH WEB GRID

File->New->Project


select : ASP.NET MVC 4- Application
AND CLICK ON OK

And select the project template and click on ok


Now Go to Solution Explorer


And again go to solution explorer and add new item 
and add ado.net entity frame work


And click on add


Click on New Connection.


Give the Details and Click on Ok Button.


Click on Finish.


And Go to Controller Folder and Right Click  AddController.


Write the following Code in Controller.


public class Default1Controller : Controller
    {
        EmployeeDatabaseEntities entities;
       
        public Default1Controller()
        {
            entities = new EmployeeDatabaseEntities ();
        }
        public ActionResult Index()
        {
            return View(entities.Employee2);
        }

        public ActionResult Delete(int id)

        {
            try
            {
                Employee2 obj = entities.Employee2.Find(id);
                if (obj == null)
                {
                    return HttpNotFound();
                }
                entities.Employee2.Remove(obj);
                entities.SaveChanges();
                return RedirectToAction("Index");
            }
            catch (Exception ex)
            {
                throw ex;
            }
        }
    }

And then Right Click on the Page and select    Add View
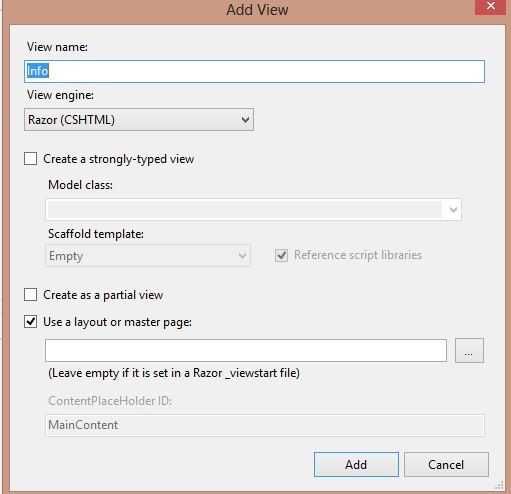


Write the following Code in Index.cs.html


@model IEnumerable<MvcApplication1.Employee2>
@{
    ViewBag.Title = "Index";
}
<style type="text/css">
    .webGrid { margin: 6px; border-collapse: collapse; width: 500px;  background-color:#B4CFC3;}
    .header { background-color: #C1D4E6; font-weight: bold; color: #FFF; }
    .webGrid th, .webGrid td { border: 1px solid #C0C0C0; padding: 5px; }
    .alt { background-color: # aqua; color: #000; }
    .gridHead a:hover {text-decoration:underline;}
    .description { width:auto}
    .select{background-color: #71857C}
</style>
<h2>Index</h2>
<div>
    @{
    var grid = new WebGrid(Model, canPage: true, rowsPerPage: 5, 
    selectionFieldName: "selectedRow",ajaxUpdateContainerId: "gridContent");
        grid.Pager(WebGridPagerModes.NextPrevious);}
    @grid.GetHtml(tableStyle: "webGrid",
            headerStyle: "header",
            alternatingRowStyle: "alt",
            selectedRowStyle: "select",
            columns: grid.Columns(
            grid.Column("EmpID"),
            grid.Column("FirstName", "FirstName", style: "description"),
            grid.Column("", header:"Delete",format: @<text>@Html.ActionLink("Delete", "Delete", "Default1", new { id = item.EmpID},null)</text>)
            ))

</div>


Output:


Other Sample:(using html attributes)

   @{
        var grid = new WebGrid(source: Model,canPage:true,canSort:true,rowsPerPage:10);
        grid.Pager(WebGridPagerModes.NextPrevious);
        @grid.GetHtml(htmlAttributes: new { id = "DataTable" },tableStyle: "table", headerStyle: "header", footerStyle: "grid-footer",columns: grid.Columns(
        grid.Column("UserID"),
        grid.Column("UserName"),
        grid.Column("Password"),
        grid.Column("RoleID","Role"),
        grid.Column("", header: "Edit", format: @<text>@Html.ActionLink("Edit", "Edit", "User", new { id = item.UserID}, new { target = "_blank" })</text>),
        grid.Column("",header:"Delete",format:@<text>@Html.ActionLink("Delete","Delete","Login",new{id=item.UserID},new{target="_blank"})</text>)));

        }


Thursday, March 5, 2015

UPLOADING AND DISPLAYING IMAGES USING MVC

Data Base Design


File->New->Project


select : ASP.NET MVC 4- Application
AND CLICK ON OK


And select the project template and click on ok


And Go to Controller Folder and Right Click  AddController.


Next go to Model Folder and Add New Item.


Write the following Code in Employee.cs


public class Employee
    {
        public int UserId { get; set; }

        [Required(ErrorMessage = "FirstName is Required")]
        public string FirstName { get; set; }
        
        [Required(ErrorMessage = "Last Name is Required")]
        public string LastName { get; set; }

        [Required(ErrorMessage = "Salary is Required")]
        public int Salary { get; set; }

        public string ImageType { get; set; }

        public byte[] ImageLength { get; set; }
      
        public HttpPostedFileBase Image { get; set; }

        public List<Employee> GetAllEmployees()
        {
            DataTable objTbl = new DataTable();
            List<Employee> employeeList = new System.Collections.Generic.List<Employee>();
            SqlConnection objCon = new SqlConnection();
            objCon.ConnectionString = "Data source=abc;User Id=123;Password=123t; Initial Catalog=testing;Connection Timeout=30;";
            SqlDataAdapter objAdp = new SqlDataAdapter("select * from EmpImg", objCon);
            objAdp.Fill(objTbl);
            foreach (DataRow dr in objTbl.Rows)
            {
                employeeList.Add(new Employee()
                {
                    UserId = Convert.ToInt32(dr["UserId"]),
                    FirstName = Convert.ToString(dr["FirstName"]),
                    LastName = Convert.ToString(dr["LastName"]),
                    Salary = Convert.ToInt32(dr["Salary"]),
                });
            }
            return employeeList;
        }

    }


Now, Go to Employee Controller and write the following Code:


        public ActionResult Index()
        {
            Employee obj = new Employee();
            
            return View(obj.GetAllEmployees());
        }

        public ActionResult Create()
        {
            return View();
        }

        public ActionResult RetrieveImage(int id)
        {
            byte[] cover = GetImage(id);
            if (cover != null)
            {
                return File(cover, "image/jpg");
            }
            else
            {
                return null;
            }
        }

        public byte[] GetImage(int Id)
        {
            SqlConnection objCon = new SqlConnection();
            objCon.ConnectionString = "------------------";
            objCon.Open();
            System.Data.SqlClient.SqlCommand command = new System.Data.SqlClient.SqlCommand("select Image from EmpImg where UserId=" + Id, objCon);
            System.Data.SqlClient.SqlDataReader dr = command.ExecuteReader();
            dr.Read();
            byte[] cover = (Byte[])dr[0];
            return cover;
        }
       
        [AcceptVerbs(HttpVerbs.Post)]
        public ActionResult Create(Employee imageViewModel)
        {
            imageViewModel.ImageType = imageViewModel.Image.ContentType;
            imageViewModel.ImageLength = new byte[imageViewModel.Image.ContentLength];
            Int32 length1 = imageViewModel.Image.ContentLength;
            byte[] tempImage = new byte[length1];
            Stream fileStream = imageViewModel.Image.InputStream;
            fileStream.Read(tempImage, 0, length1);

            SqlConnection con = new SqlConnection();
            con.ConnectionString = "-------------";
            SqlCommand cmd = new SqlCommand();
            con.Open();
            cmd.Parameters.AddWithValue("@FirstName", Convert.ToString(imageViewModel.FirstName));
            cmd.Parameters.AddWithValue("@LastName", Convert.ToString(imageViewModel.LastName));
            cmd.Parameters.AddWithValue("@Salary", Convert.ToInt32(imageViewModel.Salary));
            cmd.Parameters.AddWithValue("@ImageType", Convert.ToString(imageViewModel.ImageType));
            cmd.Parameters.Add("@Image", SqlDbType.Binary).Value = tempImage;
            
            cmd.Connection = con;
            cmd.CommandText = "insert into EmpImg(FirstName,LastName,Salary,ImageType,Image)values(@FirstName,@LastName,@Salary,@ImageType,@Image)";
            cmd.ExecuteNonQuery();
            con.Close();
            return RedirectToAction("Index");

        }


Now,  Right Click on Index Method and select  Add View:


then the Index view is created in the views Folder as shown below.


Index.cshtml


@model IEnumerable<MvcApplication2.Models.Employee>
@{
    ViewBag.Title = "Index";
}
@{
    ViewBag.Title = "Index";
}
<p>
    @Html.ActionLink("Create New Employee", "Create",null, new { @class="btn btn-primary"})
</p>
<h2>Employee Details</h2>
<table class="table" style="width: 1000px;">
    <tr>
        <th> <b>FirstName</b> </th>
        <th> <b>Last Name</b> </th>
        <th> <b>Salary</b> </th>
        <th><b>Image</b></th>
    </tr>
     @foreach (var item in Model)
    {
        <tr>
            <td> @Html.DisplayFor(modelItem => item.FirstName)
            </td>
            <td> @Html.DisplayFor(modelItem => item.LastName)
            </td>
            <td>  @Html.DisplayFor(modelItem => item.Salary)
            </td>
            <td style="width: 500px;">
                <img src="/Employee/RetrieveImage/@item.UserId" alt="" height=100 width=200 />
            </td>
        </tr>

    }


And again go to Employee Controller, and Now right click on Create Method.


Create.cshtml


@model MvcApplication2.Models.Employee
@{
    ViewBag.Title = "Create";
}
<h2>Create</h2>
@using (Html.BeginForm("Create", "Employee", FormMethod.Post, new { enctype = "multipart/form-data" })) 

    @Html.ValidationSummary(true)
    <div class="form-group">
        @Html.LabelFor(model => model.FirstName, new { @class = "control-label col-md-2" })
        <div class="col-md-10">
            @Html.TextBoxFor(model => model.FirstName, new { @class = "form-control" })
            @Html.ValidationMessageFor(model => model.FirstName)
        </div>
    </div>
    <div class="form-group">
        @Html.LabelFor(model => model.LastName, new { @class = "control-label col-md-2" })
        <div class="col-md-10">
            @Html.TextBoxFor(model => model.LastName, new { @class = "form-control" })
            @Html.ValidationMessageFor(model => model.LastName)
        </div>
    </div>
    <div class="form-group">
        @Html.LabelFor(model => model.Salary, new { @class = "control-label col-md-2" })
        <div class="col-md-10">
            @Html.TextBoxFor(model => model.Salary, new { @class = "form-control" })
            @Html.ValidationMessageFor(model => model.Salary)
        </div>
    </div>
    <div class="form-group">
        @Html.LabelFor(model => model.Image, new { @class = "control-label col-md-2" })
        <div class="col-md-10">
            <input type="file" name="Image" />
        @Html.ValidationMessageFor(model => model.Image)
        </div>
    </div>
    <div class="form-group">
        <div class="col-md-offset-2 col-md-10">
            <input type="submit" value="Create" class="btn btn-default" />
        </div>
    </div>
}
@section Scripts 
{
    @Scripts.Render("~/bundles/jqueryval")

}


Output:


http://localhost:54538/Employee/Create


Kubernetes

Prerequisites We assume anyone who wants to understand Kubernetes should have an understating of how the Docker works, how the Docker images...