File->New->Project
select : ASP.NET MVC 4- Application
AND CLICK ON OK
And select the project template and click on ok
Now Go to Solution Explorer
And again go to solution explorer and add new item
and add ado.net entity frame work
and add ado.net entity frame work
And click on add
Click on New Connection.
Give the Details and Click on Ok Button.
Click on Finish.
And Go to Controller Folder and Right Click AddController.
Write the following Code in Controller.
public class Default1Controller : Controller
{
EmployeeDatabaseEntities entities;
public Default1Controller()
{
entities = new EmployeeDatabaseEntities ();
}
public ActionResult Index()
{
return View(entities.Employee2);
}
public ActionResult Delete(int id)
{
try
{
Employee2 obj = entities.Employee2.Find(id);
if (obj == null)
{
return HttpNotFound();
}
entities.Employee2.Remove(obj);
entities.SaveChanges();
return RedirectToAction("Index");
}
catch (Exception ex)
{
throw ex;
}
}
}
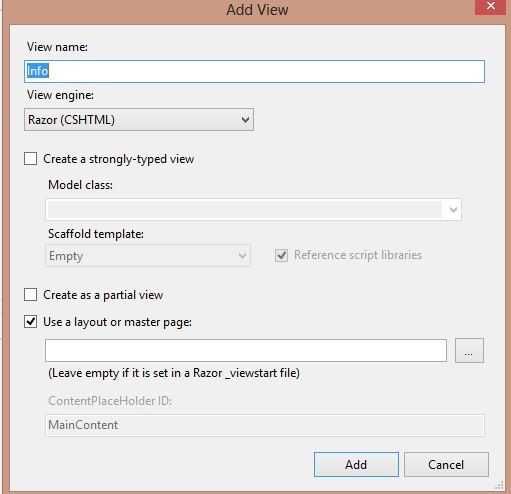
And then Right Click on the Page and select Add View
Write the following Code in Index.cs.html
@model IEnumerable<MvcApplication1.Employee2>
@{
ViewBag.Title = "Index";
}
<style type="text/css">
.webGrid { margin: 6px; border-collapse: collapse; width: 500px; background-color:#B4CFC3;}
.header { background-color: #C1D4E6; font-weight: bold; color: #FFF; }
.webGrid th, .webGrid td { border: 1px solid #C0C0C0; padding: 5px; }
.alt { background-color: # aqua; color: #000; }
.gridHead a:hover {text-decoration:underline;}
.description { width:auto}
.select{background-color: #71857C}
</style>
<h2>Index</h2>
<div>
@{
var grid = new WebGrid(Model, canPage: true, rowsPerPage: 5,
selectionFieldName: "selectedRow",ajaxUpdateContainerId: "gridContent");
grid.Pager(WebGridPagerModes.NextPrevious);}
@grid.GetHtml(tableStyle: "webGrid",
headerStyle: "header",
alternatingRowStyle: "alt",
selectedRowStyle: "select",
columns: grid.Columns(
grid.Column("EmpID"),
grid.Column("FirstName", "FirstName", style: "description"),
grid.Column("", header:"Delete",format: @<text>@Html.ActionLink("Delete", "Delete", "Default1", new { id = item.EmpID},null)</text>)
))
</div>
Output:
Other Sample:(using html attributes)
@{
var grid = new WebGrid(source: Model,canPage:true,canSort:true,rowsPerPage:10);
grid.Pager(WebGridPagerModes.NextPrevious);
@grid.GetHtml(htmlAttributes: new { id = "DataTable" },tableStyle: "table", headerStyle: "header", footerStyle: "grid-footer",columns: grid.Columns(
grid.Column("UserID"),
grid.Column("UserName"),
grid.Column("Password"),
grid.Column("RoleID","Role"),
grid.Column("", header: "Edit", format: @<text>@Html.ActionLink("Edit", "Edit", "User", new { id = item.UserID}, new { target = "_blank" })</text>),
grid.Column("",header:"Delete",format:@<text>@Html.ActionLink("Delete","Delete","Login",new{id=item.UserID},new{target="_blank"})</text>)));
}


No comments:
Post a Comment
Thank you for visiting my blog