Tuesday, October 10, 2023

Modules,NameSpaces,Exports, Imports in TypeScript

 Module is a collection of variables, functions, classes and interfaces.

 This will be reusable across different other modules with in a project.

Scenario


    <>.ts                                    <>.ts
      |                                            |
 export class c1                       import{c1,c2} from "./module1";
  {..}                                          obj=new c1();
 export class c2                              ..
  {..} 

     |                                                |
  [module1]                                [module2]


                                                       <>.ts
                                                          |
                                               import{c1,c2} from "./module1";
 
                                                          ....
                                                    [module3]

Syntax:

   export namespace <namespacename>
   {
     
        export let <varname>:<type>=value;

        export function <funcname>()
         { .. }

        export class <classname>
         { .. }

       export interface <interfacename>
         { .. }

    }


  ->export members are module public, this will be accessible outside
    module
  ->export members of one module can be accessed | referenced in another
    using "import" keyword.

NameSpace:

namespace is a logical container to group related members.

      eg:
          namespace ns1               obj1=new ns1.c1();                
               |
            class c1                        obj2=new ns2.c1();
             {}
          namespace ns2
               |
           class c1
              {}
    ->namespace is an optional


Now, I have a requirement

   module1.ts                                              module2.ts
       |                                                             |
  namespace inventory   --------------------->importing export members of
  export class category
  export class product                                       module1


Module2.ts

import{inventory} from "./Module1";
let cateobj=new inventory.category("c001","mobiles");
let prodobj=new inventory.product("p001","samsung");
cateobj.display();
prodobj.display();


Output

PS C:\Examples> tsc.cmd Module2.ts PS C:\Examples> node Module2 c001 mobiles p001 samsung

Note: Here Module2.ts compilation will perform all the dependent modules[Module1.ts]
compilation automatically
 
    tsc Module2.ts------>   compilation of Module2.ts and Module1.ts
                                    |
                                Module2.js
                                Module1.js


Note: Namespace naming is optional

Without Namespace


Output
PS C:\Examples> node Module2      
c001 mobiles
p001 samsung


Working with multiple Modules Examples


Modify the Module2.ts code as below

import{category,product} from "./Module1";
let cateobj=new category("c001","mobiles");
let prodobj=new product("p001","samsung");
cateobj.display();
prodobj.display();
export class emp{}
export class dept{};
export{category,product};


Module3.ts


Debugging in TypeScript

debugging in typescript:
------------------------
Debugging is the process of line by line execution to identify logical errors
 (or) understanding execution flow

Debugging typescript requires 2 things
 1.debugger keyword
        this will stop terminate normal execution and control will be taken into
        debug mode for line by line execution  

 2.map file
       this is a linker file between typescript code and Javascript code, this will execute
       typescript equivalent Javascript code in the background

map file can be generated using sourceMap option with typescript compiler
 syntax:
    tsc <tsfilename> --sourceMap


Browser Debug

stringExample.ts 

let link:string ="<a href= 'home.html'>Home </a>";
let year:number=2023
let msg:string =`Next Year  ${year + 1} Card Expires`;
let path:string="\"C:\\Examples\\Images\\Img1.png"

When we run this, it will generate .js file, and we need to use that in the html code.

StringExampleHtml.html

<html>
    <head>
        <title>TS - Basic Concepts</title>
        <script src="stringexample.js"></script>
        <script>
            document.write("path= " + path  + "<br>");  
            document.write("message = " + msg  +"<br>");
            document.write("link = " + link  +"<br>");
        </script>
    </head>
    <body>
        Hello World <br>
    </body>
</html>


Output with Debugger


Property in TypeScripts

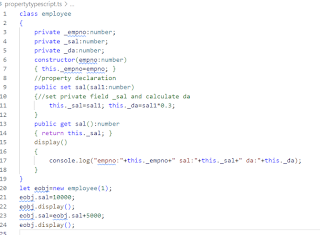
Property can be used to set or get private field of a class

Property declaration requires 2 accessors set and get

Syntax:

  public set <propertyname>(para)
  {
     set private field and perform calculation (or) validation
  }

  public get <propertyname>():<type>
  {
       return private field
  }

  Property is a combination of 2 blocks
 1.set block--writting to a property will execute set block
 2.get block--reading a property will execute get block

Example

   Emp class
     |
   sal property[set{da=sal*0.3} and get{..} blocks]
   _sal private field
   _da  private field

  e=new emp();
  e.sal=10000;-->set block execution[da=3000]

  e.sal=e.sal+5000;
          |
        reading[get block execution]
          |
         10000+5000
             |
          15000
        |
     set block exec[da=4500]

Property looks like normal public field, but internal execution will be like
methods.

Property is recommended when you want to perform calculation validation
based on specific private field.


Example


Note:
Accessors are only available when targeting ECMAScript 5 and higher

Output
empno:1 sal:10000 da:3000
empno:1 sal:15000 da:4500

Note:
*target ECMAScript version can be given to tsc using "target[-t]" option
  syntax:
       tsc <tsfilename> -t ecmascript version[es5|es6|..]


Sample way of calling ECMAScript 
*goto terminal
  >tsc propertydemo.ts -t es5
  >node propertydemo

Monday, October 9, 2023

Dependency injection in C Sharp

The Dependency Injection Design Pattern is the most commonly used design pattern nowadays to remove the dependencies between the objects.

Dependency Injection (DI) is a design pattern used to implement IoC (Inversion of Control.

Dependency Injection is mainly on three classes

  • Service Class
  • Client Class
  • Injector Class
Client Class: The Client Class (dependent class) is a class that depends on the Service Class. That means the Client Class wants to use the Services (Methods) of the Service Class.

Service Class: The service class (dependency) is a class that provides service to the client class.

Injector Class: The Injector Class is a class that injects the Service Class object into the Client Class.

There are various ways to implement C# Dependency Injection:

  1. Constructor Dependency Injection
  2. Property Dependency Injection
  3. Method Dependency Injection

First we will learn what will  happened if we are not using DI .
Example without using Dependency Injection Design Pattern in C#
Create a Console Application

Create a Employee.cs  and add four properties to it


EmpDal.cs
This is going to service Class. This is the class that is responsible for Interacting with the Database. This class is going to be used by the EmpBal class.


EmpBAL.cs (Client)
This is  going to be Client Class. This is the Class that is going to consume the services provided by the EmpDAL Service Class. That means it is the Dependent Class which is Depending on the EmpDAL Service Class.


As you can see in the above code, in order to get the data, the EmpBal class depends on the EmpDAL class. In the GetEmployeeDetails() method of the EmpBAL class, we create an instance of the EmpDAL This is a tight coupling because the EmpDAL is tightly coupled with the EmpBAL class. Every time the EmpDAL class changes, the EmpBaL class also needs to change. This is the problem. Let us see how to use constructor dependency injection to loosely couple these classes.

Using Constructor Dependency Injection Design Pattern in C#
Let us see, how we can use it in the constructor . To make the classes loosely coupled we will first modify the EmpDal.cs as below. We will create a new interface class file and inherit that in the EmpDal.cs file


As, per the above code Dependency Object should be Interface-Based In our example, the EmpDAL is the Dependency Object as this object is going to be used by the EmpBal class. So we created the IEmployeeDAL interface and then implement that IEmployeeDAL interface in the EmpDAL class.

Now, we will modify the EmpBal.cs class As you can see in the below code, here we created one constructor which accepts one parameter of the Dependency Object type. The point that you need to keep the focus on is, the parameter of the constructor is of the type interface, not the concrete class. Now, this parameter can accept any concrete class object that implements the IEmployeeDAL interface.


So here in the EmpBaL class, we are not creating the object of the EmpDAL class. Instead, we are passing it as a parameter to the constructor of the EmpBAL class. As we are Injecting the Dependency Object through the constructor, it is called Constructor Dependency Injection in C#.

Output


Property Injection in DI
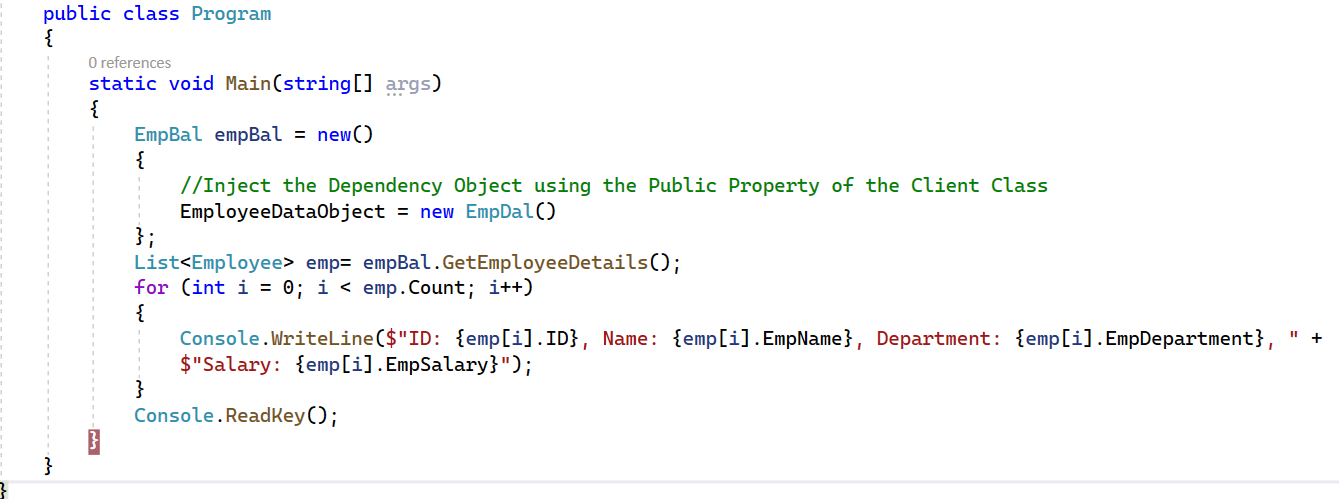
 The Injector needs to Inject the Dependency Object through a public property of the client class.

Let us modify the EmpBal.cs


As you can see in the above code, we are injecting the dependency object through a public property i.e. EmployeeDataObject of the EmpBAL class. As we are setting the dependency object through the setter property, we can call this Setter Dependency Injection in C#. Now, we need to use the property EmployeeDataObject in order to access the instance of IEmployeeDAL.

Program.cs


Method Dependency Injection 
we need to supply the dependency object through a public method of the client class

Example

Modify the EmpBal.cs


Program.cs


Output


Kubernetes

Prerequisites We assume anyone who wants to understand Kubernetes should have an understating of how the Docker works, how the Docker images...