Create a two new components
Parent and Child Components as shown below
ngOnChanges
The Angular invokes the ngOnChanges life cycle hook whenever any data-bound input property of the component or directive changes
Initializing the Input properties is the first task angular carries during the change detection cycle.
Input properties are those properties which we define using the @Input decorator. It is one of the ways by which a parent communicates with the child component.
It also fires upon initialization of input data. The hook receives one optional parameter of type SimpleChanges
Example
Child Component.ts
import { Component, Input, OnChanges, SimpleChanges } from '@angular/core';
@Component({
selector: 'app-child-component',
templateUrl: './child-component.component.html',
styleUrls: ['./child-component.component.css']
})
export class ChildComponentComponent implements OnChanges{
@Input() data: string | undefined;
lifecycleTicks: number = 0;
constructor() {
console.log('child constructor')
}
ngOnChanges(changes: SimpleChanges): void {
console.log('ng on changes child component')
this.lifecycleTicks++;
}
}
child component.html
<h3>Child Component</h3>
<p>TICKS: {{ lifecycleTicks }}</p>
<p>DATA: {{ data }}</p>
appModule.ts
Parent Component.html
<h1>ngOnChanges Example</h1>
<app-child-component [data]="arbitraryData"></app-child-component>
Parent Component.ts
import { Component } from '@angular/core';
@Component({
selector: 'app-parent-component',
templateUrl: './parent-component.component.html',
styleUrls: ['./parent-component.component.css']
})
export class ParentComponentComponent {
arbitraryData: string = 'initial';
constructor() {
console.log('Parent constructor')
setTimeout(() => {
this.arbitraryData = 'final';
}, 5000);
}
}
Output
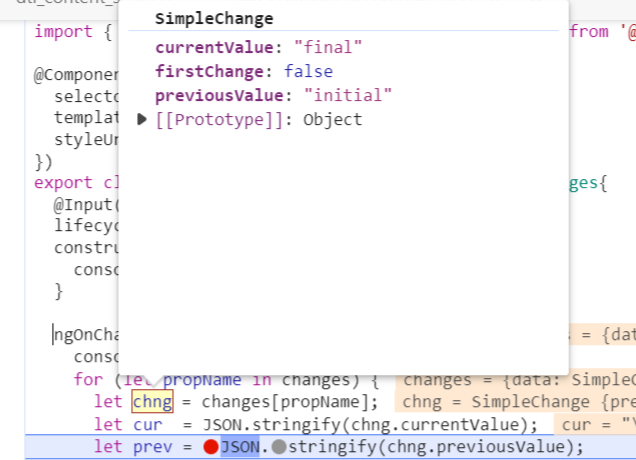
Note, from the above example we can also get the previous and current values as
shown below
ngOnChanges(changes: SimpleChanges): void {
console.log('ng on changes child component')
for (let propName in changes) {
let chng = changes[propName];
let cur = JSON.stringify(chng.currentValue);
let prev = JSON.stringify(chng.previousValue);
}
this.lifecycleTicks++;
}
ngOnInit
Fires once upon initialization of a component’s input-bound (@Input)
properties.
This hook is fired only once and immediately after its creation (during the first change detection).
The hook does not fire as Child Component receives the input data.
Rather, it fires right after the data renders to the ChildComponent template.
This is a perfect place where you want to add any initialization logic for your component.
child component.ts
import { Component, Input, OnChanges, OnInit, SimpleChanges } from '@angular/core';
@Component({
selector: 'app-child-component',
templateUrl: './child-component.component.html',
styleUrls: ['./child-component.component.css']
})
export class ChildComponentComponent implements OnInit{
@Input() data: string | undefined;
lifecycleTicks: number = 0;
constructor() {
console.log('child constructor')
}
ngOnInit(): void {
console.log('ngOnInit child component')
this.lifecycleTicks++;
}
}
Child Component.html
<h3>Child Component</h3>
<p>TICKS: {{ lifecycleTicks }}</p>
<p>DATA: {{ data }}</p>
Parent Component.ts
import { Component } from '@angular/core';
@Component({
selector: 'app-parent-component',
templateUrl: './parent-component.component.html',
styleUrls: ['./parent-component.component.css']
})
export class ParentComponentComponent {
arbitraryData: string = 'initial';
constructor() {
console.log('Parent constructor')
setTimeout(() => {
this.arbitraryData = 'final';
}, 5000);
}
}
Parent Component.html
<h1>ngOnInit Example</h1>
<app-child-component [data]="arbitraryData"></app-child-component>
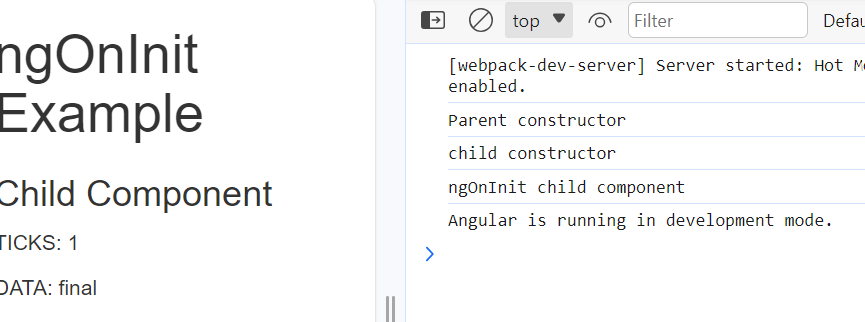
Output
ParentComponent binds input data to the ChildComponent. ChildComponent receives this
data through its @Input property. The data renders to the template. ngOnInit fires.
After five seconds, the setTimeout callback triggers.
ParentComponent mutates the data source of ChildComponent’s input-bound property.
ngOnInit DOES NOT FIRE.
ngDoCheck
Angular invoke it after the ngOnChanges & ngOnInit hooks.
It fires with every change detection cycle. Angular runs change detection frequently.
It can create performance issues when implemented incorrectly.
Example
.ts Changes
import { ChangeDetectorRef, Component, DoCheck } from '@angular/core';
@Component({
selector: 'app-ng-do-check',
templateUrl: './ng-do-check.component.html',
styleUrls: ['./ng-do-check.component.css']
})
export class NgDoCheckComponent implements DoCheck {
lifecycleTicks: number = 0;
oldTheData: string | undefined;
data: string[] = ['initial'];
constructor(private changeDetector: ChangeDetectorRef) {
this.changeDetector.detach(); // lets the class perform its own change detection
setTimeout(() => {
this.oldTheData = 'final'; // intentional error
this.data.push('intermediate');
}, 3000);
setTimeout(() => {
this.data.push('final');
this.changeDetector.markForCheck();
}, 6000);
}
ngDoCheck() {
console.log(++this.lifecycleTicks);
if (this.data[this.data.length - 1] !== this.oldTheData) {
this.changeDetector.detectChanges();
}
}
}
.html Changes
<h1>ngDoCheck Example</h1>
<p>DATA: {{ data.length }}</p>
<p>DATA: {{ data[data.length - 1] }}</p>
Output
ngAfterContentInit
ngAfterContentInit Life cycle hook is called after the Component’s projected content has been fully initialized. Angular also updates the properties decorated with the ContentChild and ContentChildren before raising this hook.
Example
Create two child Components and a Parent Component
Parent Component.ts
import { Component } from '@angular/core';
@Component({
selector: 'app-parent',
templateUrl: './parent.component.html',
styleUrls: ['./parent.component.css']
})
export class ParentComponent {
}
Parent Component.html
<h1>ngAfterContentInit Example</h1>
<p>I am A.</p>
<app-child-component2>
<h3 #BHeader>BComponent Content DOM</h3>
<app-child-component1></app-child-component1>
</app-child-component2>
Child Component 2.ts
import { AfterContentInit, Component, ContentChild, ElementRef, Renderer2 } from '@angular/core';
import { ChildComponent1Component } from '../child-component1/child-component1.component';
@Component({
selector: 'app-child-component2',
templateUrl: './child-component2.component.html',
styleUrls: ['./child-component2.component.css']
})
export class ChildComponent2Component implements AfterContentInit {
@ContentChild("BHeader", { read: ElementRef })
hRef!: ElementRef;
@ContentChild(ChildComponent1Component, { read: ElementRef })
cRef!: ElementRef;
constructor(private renderer: Renderer2) { }
ngAfterContentInit() {
this.renderer.setStyle(this.hRef.nativeElement, 'background-color', 'yellow')
this.renderer.setStyle(this.cRef.nativeElement.children.item(0), 'background-color', 'pink');
this.renderer.setStyle(this.cRef.nativeElement.children.item(1), 'background-color', 'red');
}
}
Child Component2.html
<p>I am B.</p>
<ng-content></ng-content>
Child Component1. html
<p>I am C.</p>
<p>Hello World!</p>
Output
ngOnDestroy
It fires upon a component’s removal from the view and subsequent DOM.
The ngOnDestroy or OnDestroy hook is called just before the Component/Directive instance is destroyed by Angular
Example
Child Component.ts
import { Component, OnDestroy, OnInit } from '@angular/core';
@Component({
selector: 'app-childcomponent',
templateUrl: './app-destroy-listener.component.html',
styleUrls: ['./app-destroy-listener.component.css']
})
export class AppDestroyListenerComponent implements OnDestroy,OnInit {
constructor() {
console.log('ChildComponent:Constructor');
}
ngOnInit() {
console.log('ChildComponent:OnInit');
}
ngOnDestroy() {
console.log('ChildComponent:OnDestroy');
}
}
Child Component.html
Parent Component.ts
import { Component, OnDestroy, OnInit } from '@angular/core';
@Component({
selector: 'app-app-destroy-listener1',
templateUrl: './app-destroy-listener1.component.html',
styleUrls: ['./app-destroy-listener1.component.css']
})
export class AppDestroyListener1Component implements OnInit, OnDestroy{
destroy: boolean = true;
constructor() {
console.log('Parent Component:Constructor');
}
toggleDestroy() {
console.log('toogle')
this.destroy = !this.destroy;
}
ngOnInit() {
console.log('Parent Component:OnInit');
}
ngOnDestroy() {
console.log('Parent Component:OnDestroy');
}
}
Parent Component.html
<h1>ngOnDestroy Example</h1>
<button (click)="toggleDestroy()">TOGGLE DESTROY</button>
<app-childcomponent *ngIf="destroy">I can be destroyed!</app-childcomponent>
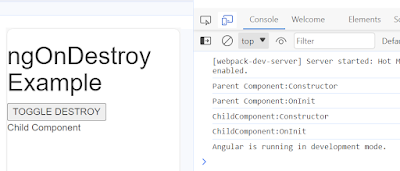
Output
On Clicking on Toogle Destroy
Again Click on Toogle Destroy
Difference Between Constructor and ngOnInit
The Constructor is executed when the class is instantiated. It has nothing do with the angular.
The ngOnInit is Angular specific and is called when the Angular has initialized the component with all its input properties
The @Input properties are available under the ngOnInit lifecycle hook. This will help you to do some initialization stuff like getting data from the back-end server etc to display in the view
@Input properties are shows up as undefined inside the constructor


