Friday, March 6, 2015

MVC WITH WEB GRID

File->New->Project


select : ASP.NET MVC 4- Application
AND CLICK ON OK

And select the project template and click on ok


Now Go to Solution Explorer


And again go to solution explorer and add new item 
and add ado.net entity frame work


And click on add


Click on New Connection.


Give the Details and Click on Ok Button.


Click on Finish.


And Go to Controller Folder and Right Click  AddController.


Write the following Code in Controller.


public class Default1Controller : Controller
    {
        EmployeeDatabaseEntities entities;
       
        public Default1Controller()
        {
            entities = new EmployeeDatabaseEntities ();
        }
        public ActionResult Index()
        {
            return View(entities.Employee2);
        }

        public ActionResult Delete(int id)

        {
            try
            {
                Employee2 obj = entities.Employee2.Find(id);
                if (obj == null)
                {
                    return HttpNotFound();
                }
                entities.Employee2.Remove(obj);
                entities.SaveChanges();
                return RedirectToAction("Index");
            }
            catch (Exception ex)
            {
                throw ex;
            }
        }
    }

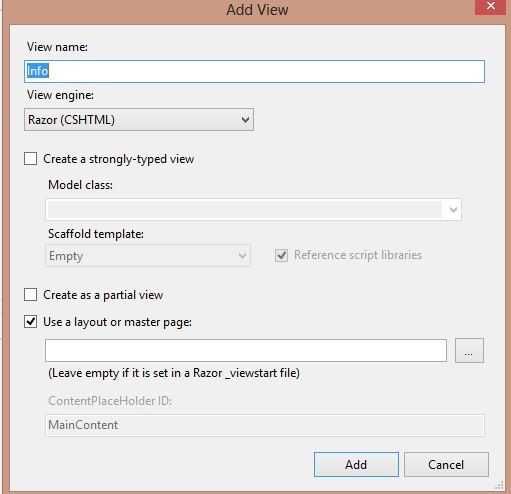
And then Right Click on the Page and select    Add View


Write the following Code in Index.cs.html


@model IEnumerable<MvcApplication1.Employee2>
@{
    ViewBag.Title = "Index";
}
<style type="text/css">
    .webGrid { margin: 6px; border-collapse: collapse; width: 500px;  background-color:#B4CFC3;}
    .header { background-color: #C1D4E6; font-weight: bold; color: #FFF; }
    .webGrid th, .webGrid td { border: 1px solid #C0C0C0; padding: 5px; }
    .alt { background-color: # aqua; color: #000; }
    .gridHead a:hover {text-decoration:underline;}
    .description { width:auto}
    .select{background-color: #71857C}
</style>
<h2>Index</h2>
<div>
    @{
    var grid = new WebGrid(Model, canPage: true, rowsPerPage: 5, 
    selectionFieldName: "selectedRow",ajaxUpdateContainerId: "gridContent");
        grid.Pager(WebGridPagerModes.NextPrevious);}
    @grid.GetHtml(tableStyle: "webGrid",
            headerStyle: "header",
            alternatingRowStyle: "alt",
            selectedRowStyle: "select",
            columns: grid.Columns(
            grid.Column("EmpID"),
            grid.Column("FirstName", "FirstName", style: "description"),
            grid.Column("", header:"Delete",format: @<text>@Html.ActionLink("Delete", "Delete", "Default1", new { id = item.EmpID},null)</text>)
            ))

</div>


Output:


Other Sample:(using html attributes)

   @{
        var grid = new WebGrid(source: Model,canPage:true,canSort:true,rowsPerPage:10);
        grid.Pager(WebGridPagerModes.NextPrevious);
        @grid.GetHtml(htmlAttributes: new { id = "DataTable" },tableStyle: "table", headerStyle: "header", footerStyle: "grid-footer",columns: grid.Columns(
        grid.Column("UserID"),
        grid.Column("UserName"),
        grid.Column("Password"),
        grid.Column("RoleID","Role"),
        grid.Column("", header: "Edit", format: @<text>@Html.ActionLink("Edit", "Edit", "User", new { id = item.UserID}, new { target = "_blank" })</text>),
        grid.Column("",header:"Delete",format:@<text>@Html.ActionLink("Delete","Delete","Login",new{id=item.UserID},new{target="_blank"})</text>)));

        }


Thursday, March 5, 2015

UPLOADING AND DISPLAYING IMAGES USING MVC

Data Base Design


File->New->Project


select : ASP.NET MVC 4- Application
AND CLICK ON OK


And select the project template and click on ok


And Go to Controller Folder and Right Click  AddController.


Next go to Model Folder and Add New Item.


Write the following Code in Employee.cs


public class Employee
    {
        public int UserId { get; set; }

        [Required(ErrorMessage = "FirstName is Required")]
        public string FirstName { get; set; }
        
        [Required(ErrorMessage = "Last Name is Required")]
        public string LastName { get; set; }

        [Required(ErrorMessage = "Salary is Required")]
        public int Salary { get; set; }

        public string ImageType { get; set; }

        public byte[] ImageLength { get; set; }
      
        public HttpPostedFileBase Image { get; set; }

        public List<Employee> GetAllEmployees()
        {
            DataTable objTbl = new DataTable();
            List<Employee> employeeList = new System.Collections.Generic.List<Employee>();
            SqlConnection objCon = new SqlConnection();
            objCon.ConnectionString = "Data source=abc;User Id=123;Password=123t; Initial Catalog=testing;Connection Timeout=30;";
            SqlDataAdapter objAdp = new SqlDataAdapter("select * from EmpImg", objCon);
            objAdp.Fill(objTbl);
            foreach (DataRow dr in objTbl.Rows)
            {
                employeeList.Add(new Employee()
                {
                    UserId = Convert.ToInt32(dr["UserId"]),
                    FirstName = Convert.ToString(dr["FirstName"]),
                    LastName = Convert.ToString(dr["LastName"]),
                    Salary = Convert.ToInt32(dr["Salary"]),
                });
            }
            return employeeList;
        }

    }


Now, Go to Employee Controller and write the following Code:


        public ActionResult Index()
        {
            Employee obj = new Employee();
            
            return View(obj.GetAllEmployees());
        }

        public ActionResult Create()
        {
            return View();
        }

        public ActionResult RetrieveImage(int id)
        {
            byte[] cover = GetImage(id);
            if (cover != null)
            {
                return File(cover, "image/jpg");
            }
            else
            {
                return null;
            }
        }

        public byte[] GetImage(int Id)
        {
            SqlConnection objCon = new SqlConnection();
            objCon.ConnectionString = "------------------";
            objCon.Open();
            System.Data.SqlClient.SqlCommand command = new System.Data.SqlClient.SqlCommand("select Image from EmpImg where UserId=" + Id, objCon);
            System.Data.SqlClient.SqlDataReader dr = command.ExecuteReader();
            dr.Read();
            byte[] cover = (Byte[])dr[0];
            return cover;
        }
       
        [AcceptVerbs(HttpVerbs.Post)]
        public ActionResult Create(Employee imageViewModel)
        {
            imageViewModel.ImageType = imageViewModel.Image.ContentType;
            imageViewModel.ImageLength = new byte[imageViewModel.Image.ContentLength];
            Int32 length1 = imageViewModel.Image.ContentLength;
            byte[] tempImage = new byte[length1];
            Stream fileStream = imageViewModel.Image.InputStream;
            fileStream.Read(tempImage, 0, length1);

            SqlConnection con = new SqlConnection();
            con.ConnectionString = "-------------";
            SqlCommand cmd = new SqlCommand();
            con.Open();
            cmd.Parameters.AddWithValue("@FirstName", Convert.ToString(imageViewModel.FirstName));
            cmd.Parameters.AddWithValue("@LastName", Convert.ToString(imageViewModel.LastName));
            cmd.Parameters.AddWithValue("@Salary", Convert.ToInt32(imageViewModel.Salary));
            cmd.Parameters.AddWithValue("@ImageType", Convert.ToString(imageViewModel.ImageType));
            cmd.Parameters.Add("@Image", SqlDbType.Binary).Value = tempImage;
            
            cmd.Connection = con;
            cmd.CommandText = "insert into EmpImg(FirstName,LastName,Salary,ImageType,Image)values(@FirstName,@LastName,@Salary,@ImageType,@Image)";
            cmd.ExecuteNonQuery();
            con.Close();
            return RedirectToAction("Index");

        }


Now,  Right Click on Index Method and select  Add View:


then the Index view is created in the views Folder as shown below.


Index.cshtml


@model IEnumerable<MvcApplication2.Models.Employee>
@{
    ViewBag.Title = "Index";
}
@{
    ViewBag.Title = "Index";
}
<p>
    @Html.ActionLink("Create New Employee", "Create",null, new { @class="btn btn-primary"})
</p>
<h2>Employee Details</h2>
<table class="table" style="width: 1000px;">
    <tr>
        <th> <b>FirstName</b> </th>
        <th> <b>Last Name</b> </th>
        <th> <b>Salary</b> </th>
        <th><b>Image</b></th>
    </tr>
     @foreach (var item in Model)
    {
        <tr>
            <td> @Html.DisplayFor(modelItem => item.FirstName)
            </td>
            <td> @Html.DisplayFor(modelItem => item.LastName)
            </td>
            <td>  @Html.DisplayFor(modelItem => item.Salary)
            </td>
            <td style="width: 500px;">
                <img src="/Employee/RetrieveImage/@item.UserId" alt="" height=100 width=200 />
            </td>
        </tr>

    }


And again go to Employee Controller, and Now right click on Create Method.


Create.cshtml


@model MvcApplication2.Models.Employee
@{
    ViewBag.Title = "Create";
}
<h2>Create</h2>
@using (Html.BeginForm("Create", "Employee", FormMethod.Post, new { enctype = "multipart/form-data" })) 

    @Html.ValidationSummary(true)
    <div class="form-group">
        @Html.LabelFor(model => model.FirstName, new { @class = "control-label col-md-2" })
        <div class="col-md-10">
            @Html.TextBoxFor(model => model.FirstName, new { @class = "form-control" })
            @Html.ValidationMessageFor(model => model.FirstName)
        </div>
    </div>
    <div class="form-group">
        @Html.LabelFor(model => model.LastName, new { @class = "control-label col-md-2" })
        <div class="col-md-10">
            @Html.TextBoxFor(model => model.LastName, new { @class = "form-control" })
            @Html.ValidationMessageFor(model => model.LastName)
        </div>
    </div>
    <div class="form-group">
        @Html.LabelFor(model => model.Salary, new { @class = "control-label col-md-2" })
        <div class="col-md-10">
            @Html.TextBoxFor(model => model.Salary, new { @class = "form-control" })
            @Html.ValidationMessageFor(model => model.Salary)
        </div>
    </div>
    <div class="form-group">
        @Html.LabelFor(model => model.Image, new { @class = "control-label col-md-2" })
        <div class="col-md-10">
            <input type="file" name="Image" />
        @Html.ValidationMessageFor(model => model.Image)
        </div>
    </div>
    <div class="form-group">
        <div class="col-md-offset-2 col-md-10">
            <input type="submit" value="Create" class="btn btn-default" />
        </div>
    </div>
}
@section Scripts 
{
    @Scripts.Render("~/bundles/jqueryval")

}


Output:


http://localhost:54538/Employee/Create


Tuesday, March 3, 2015

View State in Asp.net

View State:

View State which is used to maintain the State at a page level. 

i.e the the information is being stored for a specific page and until that specific page is active (i.e. the page which we are currently viewing). if we are redirected to some other page, the information stored in the View State will be lost. 

It uses "Dictionary Object" to store data, here the information is stored in key and value pair. It stores that information in a Hidden field on the page itself in a hashed format. 


It can store a string value upto specific length. If the length is exceeded then the excess information will be stored into another hidden field.

It maintains the state of controls during page postback and if we save any control values or anything in the viewstate than we can access that values throughout the page whenever it is required.

viewstate values are by default sent to the client browser and it returned  to the server in the form of a hidden input control on your page

Basic Example of View State:


In, this example i am going to save the view state values, and retrieving it on PageLoad


.cs page:


 protected void btnSave_Click(object sender, EventArgs e)

    {
        ViewState["FirstName"] = Convert.ToString(txtFirstName.Text);
        ViewState["LastName"] = Convert.ToString(txtLastName.Text);
        ViewState["Salary"] = Convert.ToString(txtSalary.Text);
        txtFirstName.Text = "";
        txtLastName.Text = "";
        txtSalary.Text = "";

    }

    protected void btnRead_Click(object sender, EventArgs e)
    {
        if (!string.IsNullOrEmpty(Convert.ToString(ViewState["FirstName"])))
        {
            txtFirstName.Text = Convert.ToString(ViewState["FirstName"]);
        }
        if (!string.IsNullOrEmpty(Convert.ToString(ViewState["LastName"])))
        {
            txtLastName.Text = Convert.ToString(ViewState["LastName"]);
        }
        if (!string.IsNullOrEmpty(Convert.ToString(ViewState["Salary"])))
        {
            txtSalary.Text = Convert.ToString(ViewState["Salary"]);
        }

    }

.In this example, i am saving the values in ViewState and Reteriving the saved values from viewstate , when we click on Read button.


When Click on Read Button. again the values are populated.


we can see below I am retrieving the value from the View State, 

View State Information is stored in a Hashed Format

In html view source ,we can see this


View Source we can see this as,In html view source ,we can see this


<div class="aspNetHidden">

 <input type="hidden" name="__EVENTVALIDATION" id="__EVENTVALIDATION" value="vkITvu/CexBloorOExhQydean8rSPGP8ZyiqbLqc71XNJYBLyVpWe1Fow2yFyEN43Bwh8RNard1nTm7ZZkCx99VvcjCcPGn7Y0DPvMO3WgzFbk3Xduw3HTi/aQZF6UYkd+m/nYsjvNnzVWd4b8USvmkNzAgz8ZxcCWL8v8LAJLcwiGo74HqrKcsQwKcmKBzfIfjovSysuFpRQEDa+Syk1Q==" />
</div>

-----------------------------------------------------------------------------------------

View State can be applied at the following places.

  • Application Level
  • Page Level 
  • Control Level 

Page Level.

If we dont want the page to use viewstate,then we can disable view state at page level.
we can disable or enable viewstate by using EnableViewState 


<%@ Page Language="C#" AutoEventWireup="true" CodeFile="Default3.aspx.cs" Inherits="Default3"  EnableViewState="false"%>


Example:

 In the below example i am saving the values in ViewState, and when i am trying to Read those values from Viewstate , we can see the ViewState Values are null.


Output:


At Control Level 


Application Level 

In web.config 


If View State set to off. Textbox values still Existings

They are few controls which retain there values even after disabling the ViewState?

The controls which implements IPostBackEventHandler (Textbox, Checkbox) will retain the state even though if  disable the  viewstate.  That is during the Load Postback Data phase, that controls will get state information from Posted back form.
Where as controls like label will not implement IPostBackEventHandler will not get any state information from posted back data and hence they depend on viewstate to maintain the state .

To make  view state secure?

There are two ways :
"EnableViewStateMAC=true"  (MAC Stands for "Message Authentication Code")


ViewStateEncryptionMode="Always" , which will encrypt the view state data.

ViewStateEncryptionMode.Auto
It will Encrypt the ViewState.

ViewStateEncryptionMode.Never
It will not encrypt the ViewState

ViewStateEncryptionMode.Always
ViewState is always encrypted


The following are list of controls which dont maintain state if we disable viewstate also. That is because they implement IPostBackDataHandler


TextBox
CheckBox
CheckBoxList
DropDownList
ImageButton
ListBox
RadioButtonList
HtmlInputCheckBox
HtmlInputFile
HtmlInputHidden
HtmlInputImage
HtmlInputRadioButton
HtmlInputText
HtmlSelect
HtmlTextArea


Kubernetes

Prerequisites We assume anyone who wants to understand Kubernetes should have an understating of how the Docker works, how the Docker images...