Friday, October 13, 2023

Module | NgModule in Angular

Module 

In Angular, a module is a container. In order words, we can say that a module is a mechanism to group components, services, directives, pipes. So, the grouping of related components, services, pipes, and directives is nothing but a module in angular.

Angular supports modular application development with collection of
modules called as NgModules
A module | ngmodule is a collection of components, pipes, directives and modules
Every Angular app should have one root | main module called
 AppModule

Note:

In TypeScript, we can do this by using the “import” and “export” keywords. That means the modules which need to be exposed should be declared using the “export” keyword while the modules which want to import the exported modules should have the import keyword.

The default module which is created by the angular framework when we create a new application, 

When we create a new angular project using the Angular CLI command, one module i.e. AppModule (within the app.module.ts file) is created by default within the app folder which you can find inside the src folder of your project 

For any angular application, there should be at least one module. The AppModule (app.module.ts file) is the default module or root module of our angular application. 

Every Angular app should have one root | main module called
 AppModule

A typescript class applied | prefixed with "NgModule" decorator will be
 considered as a module by angular
 syntax:
    @NgModule({
       declarations:[..],
       imports:[...],
       exports:[..],
    bootstrap:[..],
       ..
            })
   export class <modulename>Module


Let us understand the default module code first

appmodule.ts


Here, AppModule is the module name and it is decorated with the @NgModule decorator. The @NgModule imported from the angular core library i.e. @angular/core

Here, we call NgModule a decorator because it is prefixed with @ symbol. So, whenever you find something in angular, that is prefixed with @ symbol, then you need to consider it as a decorator.


As you can see in the above image, the @NgModule decorator accepts one object and that object contains some properties in the form of arrays. By default, it has included 4 arrays (declarations, imports, providers, and bootstrap). Let us understand each of these properties of the @NgModule decorator.


declarations: specify component names, pipe names and directive names to be
                    placed into a module


Example:
By default when we create  a angular application, a default Component with name AppComponent is created. and that component should have been declared in the appmodule.ts in the declarations part


Now, in the appmodule.ts, by default it should import and declare that component.


Imports Array[imports]--specify module names to be imported.

By default you will find two modules in the imports that is BrowserModule and AppRoutingModule. Similar like component here also we need to import a module and then reference Them.


Providers Array (providers):

We need to include the services in the provider’s section. Whenever you create any service for your application, first you need to include a reference of that service in the provider’s section and then only you can use that service in your application.


Bootstrap Array (bootstrap):

This section is basically used to bootstrap your angular application i.e. which component will execute first. At the moment we have only one component i.e. AppComponent and this is the component that is going to be executed when our application run. So, this AppComponent is included in the bootstrap array as shown in the below image.


How to create own custom Module in Angular

Syntax to create a module

ng generate module modulename

ng g module modulename


What is the reason for creating custom Module

Suppose we have got a site which need to have information about customer, hr ,finance. In this case we need to create separate component for all this . So in the appmodule.ts then you need to import that component as well as you need to include a reference for that component in the declarations array of the @NgModule decorator.

Imagine if you are creating hundreds or thousands of components, then you need to import and include references for all the components within the root module (AppModule) which becomes very difficult to manage as it becomes complex. To overcome that problem we are creating Module


Step by Step Procedure to create Own Module

Step 1

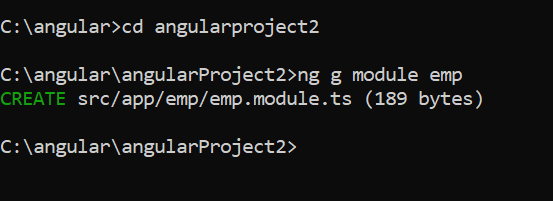
Create emp Module


 Now, let us create a login Component inside emp Module


Step2: Creating EmployeeLogin Component within Employee module folder


Now you can see in the empmodule.ts


Note: If you declare a component in one module, then you can’t declare the same component in another module. If you try then you will get an error when you run your application. 

At the moment you already declared the EmployeeLoginComponent within the Employee module and if you try to declare it again on the AppModule module then you will get an error when you run your application.

Step4: Adding Employee module reference in AppModule import section


Decorators in Angular(@ )

Decorator:
----------

Typescript -------->Decorator function--------->Angular requirement
     class                    [modify]

Decorator is a function that will modify typescript class to the requirement
 of angular

Syntax:
    @<decoratorname>({
                   info==>metadata
                    })
    export class <classname>
     { .. } 

Decorator function name should be prefixed with @ symbol
Angular is providing so many decorator functions
 
1.component decorator--It will convert typescript class into component class
                        of angular
 2.NgModule decorator--it will convert typescript class into module class
                       of angular
     ..
Decorator function will attach metadata to the typescript class, this metadata
 will inform angular what the class mean and how the class to be processed
Metadata will describe typescript class to angular, based on this angular
 will execute typescript class
Metadata will differ to different decorators


we have @NgModule Decorator , Once a class is decorator with @NgModule Decorator, then only the class works as a module.

Different  Types of Decorator

  1. Class Decorators: @Component and @NgModule
  2. Property Decorators: @Input and @Output (These two decorators are used inside a class)
  3. Method Decorators: @HostListener (This decorator is used for methods inside a class like a click, mouse hover, etc.)
  4. Parameter Decorators: @Inject (This decorator is used inside class constructor).


Angular Components

 What are Angular Components

Component  is technically a class that contains information, which specifies the presentation and functionality.

Components are the building blocks of Angular Applications.

OR

Component is a view[webpage] to provide user interaction for accepting data (or)
 displaying data
    (or)
Component is a class to combine related fields, logic[methods],markup and styling as one unit

A component get its behavior from component based class which is defined in @angular/core library.

Angular component internally use framework like MVC Model view controller ,MVVM.

View: It declares the application UI

Controller: It defines the application specific logic. In Angular a controller is defined in Typescript that is trans compiled into Javascript.

A controller is configured with meta data , that specify the view in html and css and the logic in the typescript class.

A template consists of


A component is extending directive. Angular directive comprises of information that enables communication between html and angular to convert the static DOM into dynamic DOM.

 A typescript class applied with "component decorator with metadata" will be
 identified as component class by angular

Syntax:
    @Component({
            selector:'..',
            template :'..',
            templateUrl:'..',
           styles   :[..],
           styleUrls     :[...]
      })
   export class <classname>Component
   {
       fields
         +
       methods[logic]
   }

Component class name should end with "Component" keyword, it is not a mandatory, but recommended practice

@Component({
  selector: 'app-root',
  templateUrl: './app.component.html',
  styleUrls: ['./app.component.css']
})


selector: It specifies the directive name which is used to access the component.

HeaderComponent                                  AboutComponent
         |                                                                |        
    selector:'app-header'                             selector:'app-about' 
    template:`                                             template:`
             <h2>caption</h2>--------- --- >       <app-header></app-header>
            image logo                                       <h2>display company profile</h2>
               `                                               

                                                    contact Component
                                                         |
                                                   template:`
                                                          <app-header></app-header>
                                                           ...
                                                            `
  
selector can be anything, recommended is app-component name[app-header,..]
selector name acts like a tag name to a component


template: It defines the mark up to be rendered.

templateUrl: It specifies the external file that contains the mark up to be rendered.


Difference between template vs templateUrl

Template will mix markup[html] with logic part by placing into ts file, This doesn't
allow parallel development of design part and logic part.

Template URL will separate markup[design part] from ts file into html file, this allows
     parallel development of design part and logic part  

Template doesn't provide intellisense  and autocompletion  
Template URL with html file will provide intelligence and autocompletion.

Template doesn't provide readability
Template URL provides readability

styles: It defines inline styles for elements.

StyleURLs: It specifies the css file that contains the styles to be used for component.

Difference between styles vs Styles URLS

Styles will be unique to a component.
StyleURL CSS Files will be reusable across components.

Styles will not provide intellisense and autocompletion. StyleUrls will provide intellisense and autocompletion
Styles doesn't provide readability StyleUrls provides readability. Styles supports normal css
StyleUrls supports different stylesheet formats[css,scss,sass,stylus]

Adding a component Explictity

Go to the app folder

Add New File(+ icon)

Name it as "HomeComponent.ts"


Write the below code in the HomeComponent.ts


import { style } from "@angular/animations";
import { Component } from "@angular/core";

@Component({
    selector: 'app-home',
    template: `<h2> Pawan Kalyan Fans  </h2>`,
    styles: ['h2 {color:red }']
  })
  export class HomeComponent {

  }


Go to app.module.ts and register component


Now, the component need to inject in Index.html File

Goto Index.html and add component to the page


Adding a component with separation concerns i.e separate the code and UI.

Add a new folder into app folder by name "Login"

Add following files into Login Folder

-login.component.ts

-login.component.html

-login.component.css


-login.component.html

<fieldset>
    <legend>Login</legend>
    <dl>
        <dt>User Name </dt>
        <dd><input type="text"></dd>
        <dt>Password</dt>
        <dd><input type="password"> </dd>
    </dl>
    <br>
    <button class="buttonstyle">Login</button>
</fieldset>

-login.component.css

.buttonstyle {
    background-color:green;
    color: aqua;
}
-login.component.ts

import { Component } from '@angular/core';
@Component({
    selector: 'app-login',
    templateUrl: './login.component.html',
    styleUrls: ['./login.component.css']
  })
  export class LoginComponent {
  }


Goto appmodule.ts


Now go to index.html


Output:


Note: we can generate a component with angular cli commands
ng generate component register
or
ng g c register

If you want to ignore the spec file , then use the below command


ng generate component cart --skip-tests

1.ng new <projectname>
   this will create angular project by supporting component creation 
   with all the files[4 files--> ts,html,css and spec.ts]
                                                   |
                                                 unit test file
  Example: goto command window
      >ng new app1 --dry-run
       would you like to add angular routing? n
       which stylesheet format would like to user: press enter
        css[default]
        Scss
        Sass
        Less
                ....
            app.component.ts
            app.component.html
            app.component.css
            app.component.spec.ts

   note:
     dry-run option will show project structure[files] without creation

1.ng g c <name>
   
This will create a new folder with component files based on angular.json
setting, the folder will created inside app folder

  Go to terminal [app1 folder with vs code]
   1 ng g c demo --dry-run


2 ng g c <name> --flat
       This will create component files into app folder without new folder
       creation

    >ng g c demo --dry-run --flat


3.ng g c <name> --inline-style true | false
     This will override project level setting[angular.json setting]

       true--component without css file
       false--component with css file


  4.ng g c <name> --inline-template true | false

      true--component without html file
      false--component with html file

     >ng g c demo --dry-run --flat --inline-template   


  5.ng g c <name> --skip-tests true|false

       true--component without spec file
       false--component with spec file

ng g c demo --dry-run --flat --skip-tests false


Note:

The most important point that you need to keep in mind is that in Angular application everything is a component. That means the components are the basic building blocks of an Angular application. The most important advantage of this component-based development approach is that it provides support for code reusability. That means you can reuse the same component in multiple places. This Component-based development approach also provides great support for unit testing the Angular application.


Kubernetes

Prerequisites We assume anyone who wants to understand Kubernetes should have an understating of how the Docker works, how the Docker images...